How to make your Ubuntu 20.04 look like macOS ? Linux to macOS | Amazing Customization
Hello Guys. We are back again. In the previous post, we learned how we can install Ubuntu 20.04 in your android phone using termux and access it using vnc viewer application. I hope you guys aren't having any problems/issues regarding accessing and operating the Ubuntu desktop environment. If you are having any kind of issues, feel free to drop a comment explaining your issue.
Today, in this post we are going to learn how we can customize the Ubuntu and give it a amazing look like macOS. I know you guys are now excited to learn how one can customize the linux and make it look like amazing and rich macOS. It sounds literally amazing, doesn't it ? Without any further delay, let's begin the amazing customization process and make our Ubuntu look like macOS.
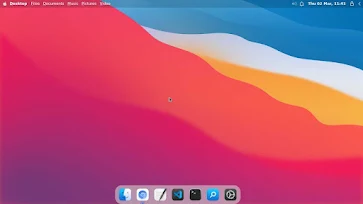
After customization, our Ubuntu will look like :-
You can see how amazing and rich looks it have. I think now you guys are more excited to get your linux customized to macOS. In fact, many developers have developed themes for linux operating system. So, to customize our Ubuntu, we will be using some themes which will make our linux desktop look like macOS. Let's begin.
First, open up a terminal and update and upgrade the system by following commands :-
apt update && apt upgradeThe themes, icons and wallpapers are hosted in github, so in order to use them we can either download directly or clone the repository. And for that we will need git package, so we must install it. Execute the following command on your terminal to install git.
apt install gitCloning the repository
Now, let's download the themes. To download the themes, execute the following commands.
git clone https://github.com/vinceliuice/whitesur-gtk-themegit clone https://github.com/vinceliuice/whitesur-icon-themegit clone https://github.com/vinceliuice/whitesur-cursorsgit clone https://github.com/vinceliuice/whitesur-wallpapersScript Installation
Now, you need to run installation script available inside each cloned folder. To do so execute the given commands.
cd whitesur-gtk-theme && ./install.shcd whitesur-icon-theme && ./install.shcd whitesur-cursors && ./install.shcd whitesur-wallpapers && ./install-wallpapers.shWe have successfully installed all the required packages. Now we have to just set them up.
Changing the appearance & icons
Click on applications situated at the top left corner. Then click settings > Appearance > Style > select WhiteSur-Dark (if you want dark theme) or WhiteSur-Light (if you want light theme). For changing icons, select Icons (right to Style) and select WhiteSur-dark (if you want dark theme) or WhiteSur (if you want light theme). Now, the appearance and icons are changed and must be giving feel like macOS.
